> ## Documentation Index
> Fetch the complete documentation index at: https://docs.markapidown.net/llms.txt
> Use this file to discover all available pages before exploring further.
# API Flow Testing Pipelines
> Chain markdown endpoint specs into executable API flows that capture response values and inject them into later steps.
## What is a pipeline?
A pipeline is a markdown file in `api-docs/flows/` that chains endpoint specs into sequential or parallel steps. Each step can capture values from a response and inject them as variables into later steps auth tokens, resource IDs, pagination cursors, and anything else extracted from a live response.
```text theme={null}
Create user ── capture response.body.id as userId
↓
Login ── inject userId, capture response.body.token as authToken
↓
Get profile ── inject userId and authToken
```
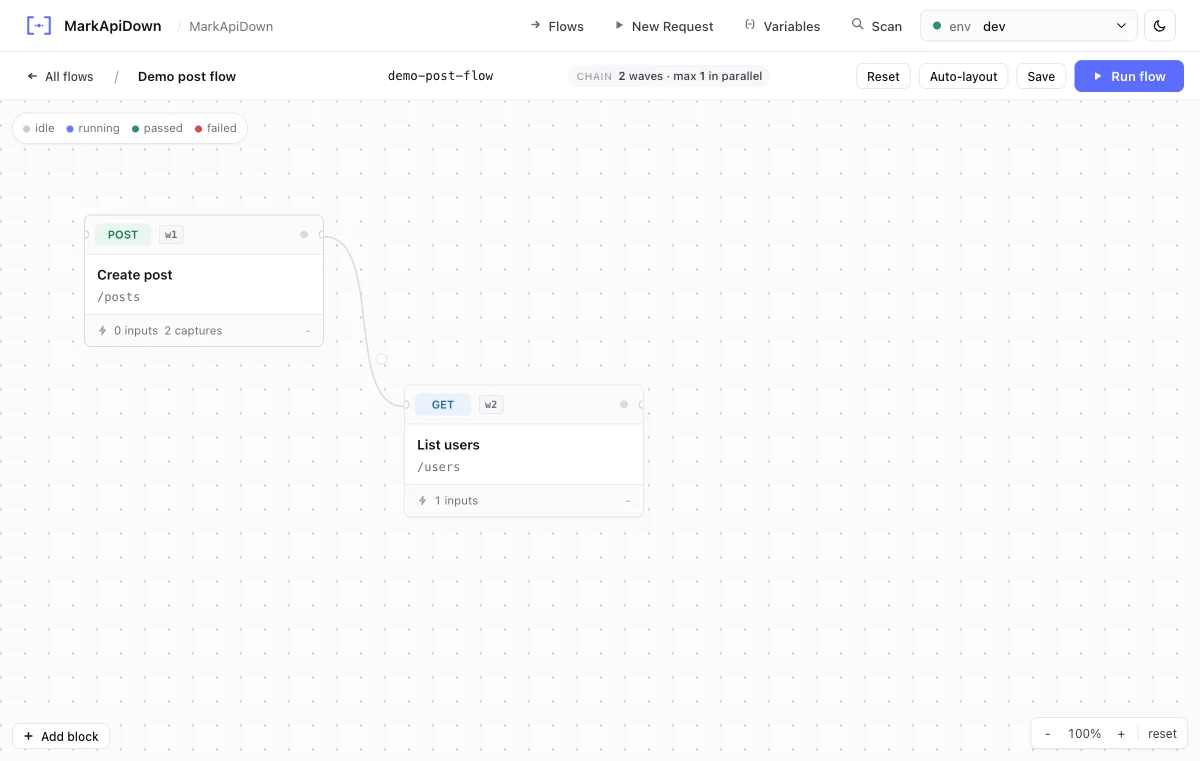
You can write this markdown by hand, ask an agent to create it, or design it visually in the [Web preview](/guides/web-preview) flow canvas.
***
## Pipeline frontmatter
Pipeline files use the same frontmatter delimiter as endpoint files, with a required `type: pipeline` field.
```yaml filename="api-docs/flows/user-onboarding.md" theme={null}
---
type: pipeline
name: user-onboarding
description: Create a user, log in, and pair a device.
continue-on-error: false
parallel: false
---
```
| Field | Required | Type | Description | Default |
| ------------------- | -------- | ------- | ------------------------------------------------------- | ------- |
| `type` | yes | string | Must be `pipeline` | |
| `name` | yes | string | Stable pipeline name used in CLI output and reports | |
| `description` | no | string | Human-readable summary shown in web preview and reports | |
| `continue-on-error` | no | boolean | Keep running after a failed step | `false` |
| `parallel` | no | boolean | Run independent steps concurrently | `false` |
***
## Step syntax
Steps are a numbered ordered list under `## Steps`. Each item names the step and points to an endpoint file path relative to `api-docs/`.
```markdown theme={null}
## Steps
1. **Create user** → `apis/users/create-user.md`
- Capture: `response.body.id` as `userId`
2. **Login** → `apis/users/post-login.md`
- Inject: `userId`
- Capture: `response.body.token` as `authToken`
3. **Pair device** → `apis/devices/post-pair.md`
- Inject: `authToken`, `userId`
- Assert: `response.status == 201`
```
### Step directives
Extract a value from the response and save it as a named variable for use in all subsequent steps.
```markdown theme={null}
- Capture: `response.body.id` as `userId`
- Capture: `response.body.token` as `authToken`
- Capture: `response.headers.x-request-id` as `requestId`
- Capture: `response.body[0].id` as `firstItemId`
- Capture: `response.body.items[2].sku` as `thirdSku`
```
Supported capture expression patterns:
| Pattern | Example | When to use |
| -------------------------------- | ---------------------------- | --------------------------------------- |
| `response.body.` | `response.body.id` | Simple top-level JSON field |
| `response.body..` | `response.body.data.token` | Nested JSON field |
| `response.body[].` | `response.body[0].id` | Field from the nth item in a JSON array |
| `response.body.[].` | `response.body.items[0].sku` | Nested array item field |
| `response.headers.` | `response.headers.Location` | Response header value |
Use JSONPath-style dot notation for JSON responses. Captured values have the highest variable priority and override all other sources for all later steps in the pipeline.
Declare which captured variables from previous steps this step requires.
```markdown theme={null}
- Inject: `authToken`, `userId`
```
Injected variables are resolved from earlier `Capture` directives. If the named capture has not happened yet because the producing step hasn't run or failed Reqbook returns an error before sending the request.
Add a pass/fail condition evaluated after the step's `## Expected response` comparison.
```markdown theme={null}
- Assert: `response.status == 201`
- Assert: `response.body.active == true`
```
A failing `Assert` is treated the same as a failed expected response check. If `continue-on-error: false`, the pipeline stops at that step.
***
## Sequential vs parallel execution
Steps run in the order they appear in the `## Steps` list.
* If `continue-on-error: false` (the default), the pipeline stops at the first failing step and reports which step failed.
* Captured values are available to all steps that appear after the capturing step.
* Use sequential pipelines whenever later steps depend on the results of earlier ones which is true for most real-world flows.
Set `parallel: true` in the frontmatter to allow Reqbook to run independent steps concurrently.
* A step that uses `Inject` always waits for the step that produced the required `Capture` before it starts.
* Steps with no `Inject` dependency may run at the same time as other independent steps.
* Use parallel pipelines for independent setup steps such as seeding multiple test fixtures before a main flow begins.
Prefer a simple rule: if a step injects a captured value, keep it after the step that captures that value. Independent setup steps can run in parallel.
***
## Running a pipeline
```bash theme={null}
rqb serve
```
Open the flow canvas, select a flow, run it, and inspect each step result. Use the canvas when you are designing captures and connections.
 ```bash theme={null}
# Run a pipeline
rqb flow api-docs/flows/user-onboarding.md --env=dev
# Inject additional variables at the CLI level
rqb flow api-docs/flows/user-onboarding.md --env=staging --var email=test@example.com
# Force sequential execution even if parallel: true is set
rqb flow api-docs/flows/user-onboarding.md --no-parallel
# Structured JSON output for CI
rqb flow api-docs/flows/user-onboarding.md --output=json
```
***
## Complete example
```markdown filename="api-docs/flows/user-onboarding.md" theme={null}
---
type: pipeline
name: user-onboarding
description: Create a user, log in, and verify the profile.
continue-on-error: false
parallel: false
---
# User onboarding
End-to-end flow from account creation to profile verification.
## Steps
1. **Create user** → `apis/users/post-users.md`
- Capture: `response.body.id` as `userId`
2. **Login** → `apis/users/post-login.md`
- Inject: `userId`
- Capture: `response.body.token` as `authToken`
3. **Get profile** → `apis/users/get-user-by-id.md`
- Inject: `authToken`, `userId`
- Assert: `response.status == 200`
```
Keep pipeline files short and focused on one user journey. A pipeline that tests ten unrelated things is harder to debug when step 7 fails. Prefer one pipeline per scenario.
```bash theme={null}
# Run a pipeline
rqb flow api-docs/flows/user-onboarding.md --env=dev
# Inject additional variables at the CLI level
rqb flow api-docs/flows/user-onboarding.md --env=staging --var email=test@example.com
# Force sequential execution even if parallel: true is set
rqb flow api-docs/flows/user-onboarding.md --no-parallel
# Structured JSON output for CI
rqb flow api-docs/flows/user-onboarding.md --output=json
```
***
## Complete example
```markdown filename="api-docs/flows/user-onboarding.md" theme={null}
---
type: pipeline
name: user-onboarding
description: Create a user, log in, and verify the profile.
continue-on-error: false
parallel: false
---
# User onboarding
End-to-end flow from account creation to profile verification.
## Steps
1. **Create user** → `apis/users/post-users.md`
- Capture: `response.body.id` as `userId`
2. **Login** → `apis/users/post-login.md`
- Inject: `userId`
- Capture: `response.body.token` as `authToken`
3. **Get profile** → `apis/users/get-user-by-id.md`
- Inject: `authToken`, `userId`
- Assert: `response.status == 200`
```
Keep pipeline files short and focused on one user journey. A pipeline that tests ten unrelated things is harder to debug when step 7 fails. Prefer one pipeline per scenario.